Sunday, January 22, 2017

Homestead Green Building: Interiors and Resources

At this point in the process, you're probably a bit tired.  Am I right?  You've built your home, supplied it with necessary power and water.  You've possibly even taken the time to grow and process your own wood, mixed up your own paints.  Maybe you even built a temporary home for you to live in while your homestead dreams began to take shape.  So why not take a break here?  Go out and buy cabinets and furniture, or use what you already have.  You can, absolutely.  There's nothing wrong with that.  But if you're watching every penny, and you're not in a hurry, why not take this extra step?  Hmm.... well, let's see.  You're not a carpenter?  You're not an upholsterer?  You probably weren't a builder before undertaking the build of your own homestead, either.  Anything is possible.  So why not have some fun?


There are many reasons to take some time here.  If going green is a real concern for you for whatever reason, this is a great opportunity for you to continue on that path.  Bring it in from the building itself into the things in your home that you will be using, sitting on, etc. every day.  You can choose what materials you use, what finishes are applied, every last detail.  Keep it as green as you want it to be.  Pick materials that best suit you and your lifestyle.  Are you going completely primitive with no electricity?  Are you wanting to go off grid and green, but still be connected?  How rustic do you want to go?  Or how modern?  By not purchasing pre-made furnishings, you have much more say.  Want an extra long sofa? Want an overly over-stuffed chair?  That can get really expensive real quick.  Build it yourself to your exact specifications.  All it takes is a little effort and planning. Yes, it may take a bit more sweat equity, but it can be very inexpensive, rewarding, and fulfilling, depending on what you're wanting. At this point, you're pretty much on a roll.  Don't stop now.  You're almost at the finish line.


Now, if you've used cob, adobe, or something of that nature to build you're home, continue with the theme.  It's very easy to use the same mix to create built in benches, chairs, sofas, bed frames, tables, and even sinks and bathtubs.  Build them right into the walls as you go.  Get creative.  Add some sculptural elements into your creations.  Make it unique.  Make it you.  You can even build a rocket stove for that extra bit of warmth in the winter.


Reclaimed wood is another great thing to use.  Everything from your floors to your walls, your kitchen cabinets, your table and chairs.... anything you want can be made from reclaimed wood.  You can use pallets, look for construction or remodeling projects going on around town, and ask if you can have their extra wood, even the local dump can be a place to score some wood.  I even found some beautifully perfect pieces of plywood sitting out for the garbage collector right around the corner from my house.  You might just be surprised at what people throw out.  No matter where you find your wood, just make sure to take your time to really look at the wood.  Make sure there is no rot or mold, and, depending on it's intended purpose, make sure it's the same or similar types of wood, not a lot of warping or knots that can buckle when under weight.  You may also want to figure out if the wood has been chemically treated in some way.  For a lot of reclaimed wood, that may or may not be possible.  You'll just have to use your best judgement.  However, if you're specifically using pallets, maybe this can help you determine what, if anything, has been done to the wood.  Or, if you've already gone the extra step of growing (or buying) bamboo for any other part of your home, then that can also be used for furniture or.....


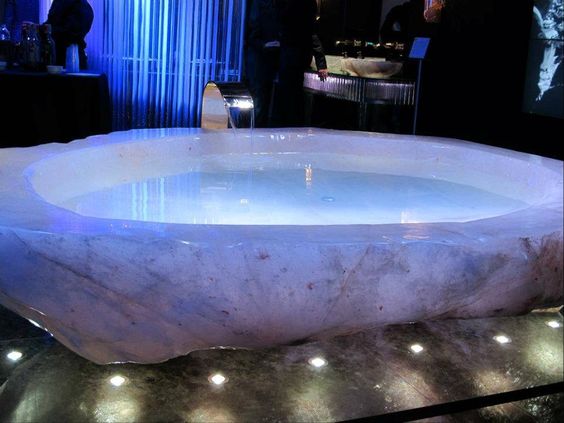
What about counter tops?  Yep, you can do those, too.  You can use the reclaimed wood, bamboo, or even salvaged butcher block. Other surfaces, again, may be obtained possibly from remodeling or construction jobs.  If you do this, please make sure to ask before you grab.  Some construction companies make a small profit from recycling themselves, or have other protocols for discarding unused materials.  It's always best to ask.  Another option is to build a mold and pour a concrete counter.  I would, obviously, recommend to do this in rather small sections.  Otherwise, it may simply be too heavy to lift.  Now, that might not be an issue for you if you have a bunch of people with muscles to help you out.  But still.  Don't overdo it.  Remember that you still have to have a cabinet underneath it that is strong enough to support the weight.  There are companies out there that specialize in green options for counter tops.  So this could be one of those places where you can spend a bit of extra money if you've saved enough in other areas.  Now if you really want a special touch, and don't mind the expense (because, wow! some of the prices), look into semi-precious stone counters.  Beautiful, luxurious feeling, natural.  You can even get sinks and bathtubs made from these stones.  They are incredible!  Now you can also get a similar look by taking a collection of smaller stones, inexpensive slices of agate, or whatever else you want, and encase it in a food-friendly, natural resin.


You can even customize the little things, like light fixtures.  You can use anything from mason jars, to bottles to globes.  Then, all you need is the wiring, which can be acquired relatively inexpensively from any hardware store.  Again, make them special.  Make them unique.  If you need ideas, look on Pinterest or Instructables.  You can even find out how to build your own coffee maker (I really love my coffee, so this one is my personal favorite).  You can find ideas for just about anything you could possibly imagine.  Anything, big or small, you can get tons of ideas here.


So, if you've decided you want to repurpose, recycle, or build anything and/or everything that goes into your home, where do you go to find the stuff you're going to need?  As I mentioned above, roadside, construction/remodeling jobs, and the landfill are all good places to start.  While Craigslist can sometimes have a bad rap, you can find some really good deals there.  Make sure to check out the "free" section.  Similar sites are abundant.  Check out LetGo, Wallapop, OfferUp, or Varagesale.  I've not personally dealt with these sites, but I know people who have.  As with any site, there are good and bad experiences.  Above all, be safe.  If you meet with someone to acquire something, meet in public, take a friend or two... you know, the common sense safety measures.  Another place to try is freecycle, or a similar site.  Everything there is free, and most communities have one, or have one not too far away.  Check out thrift stores and garage sales.  Network with an online yard sale.  They are abundant on social media.  Find a Habitat for Humanity Re-Store.  Get good quality materials, save a bit of money, and help out a wonderful charity all in one.  These are also good resources throughout the building process.


Keep an open mind, keep the creative and independent spirit alive throughout the entirety of your building experience.  Don't forget the small stuff.  The little details are what makes your home truly and completely YOUR home.  Don't try to think outside the box.  Just get rid of the box altogether, and use your imagination.  It may have been a long road up to this point.  You're almost finished.  Keep your eyes on the finished dream you've envisioned up to this point.  And as always, have fun!

http://www.houzz.com/ideabooks/2001823/list/ecofriendly-materials-kitchen-countertops

http://www.earthporm.com/28-surreal-interior-design-ideas-that-will-take-your-house-to-another-level/

https://www.msistone.com/countertops/

http://www.hgtv.com/design/rooms/kitchens/choosing-countertops-natural-stone

http://www.fivestarstoneinc.com/11-types-of-stone-countertops/

http://www.stonesource.com/choosing-a-countertop-material/

http://www.diyrecycled.com/furniture/7-diy-old-rustic-wood-furniture-projects/

http://www.semipreciousstonez.com/semi-precious-stone-bathtub.htm


Monday, January 16, 2017

Homestead Green Building: Natural Paints


Painting.  Not something that you generally put too much thought into, other than picking a color, right?  Well, I'm here to tell you that you should put some thought into it.  Color is important, yes.  But there are other considerations, as well.  If you have spent this much time and energy thus far in designing and building an off grid homestead that's truly green, then don't stop before planning your paint.  The readily available paints that are currently on the market are loaded with chemicals.  You know that classic "fresh paint smell"?  Yeah, that's off-gassing.  And that is also the reason why many people get headaches, nausea, and other issues when painting, especially in a non-ventilated area.  Even the newer paints that are labeled as free of VOC's (volatile organic compounds), they still have other chemicals and artificial colorants in them.  So what is a person to do?  The good news is that you can easily buy or even make, your very own natural, environmentally friendly paints.  The even better news?  They are incredibly fast and easy to make.  Primarily, all you need is pigment and a binder.  The down side?  Mix up only what you can use within a day or two (depending on what type of paint you're making).  Some of these can go bad relatively quickly.  So are you ready to learn more?  Great!  I'll include links at the end with recipes for the various paints, how-to's, and suppliers. But here are the basics.


Have you ever heard of milk paint?  Often called casein paint, it's actually something found quite commonly on older/antique furniture.  It's been around for a while.  You can buy pre-made milk paint.  If you'd rather do that, by all means go for it.  Just make sure to thoroughly research the company that makes it.  There are "milk paints" on the market that are not true milk paints.  To make your own is really easy.  The basic recipe is milk, white vinegar, pigment, and water.  At room temperature, mix the milk and vinegar.  The vinegar causes the milk to curdle.  This usually doesn't take too long, maybe 20 - 30 minutes.  Separate and rinse the curd to thoroughly remove they whey, add pigment and just enough water to make your paint.  That's it. You're ready to go.  It makes a beautiful and simple paint.  You can also make a glaze by adding oil (like linseed oil) instead of the water.  See?  Easy.  Now like I mentioned above, only make enough that you can use within a day, maybe two.  You can store it in the refrigerator, but it doesn't take more than a couple of days for the milk to start to go bad, so use it quickly.  You can also use powdered milk if you choose.  It will drop the overall price of ingredients a little.  Just take the powdered milk and add enough water to make the consistency of traditional pain.  Then add your pigment.  Paint away!


Next up is egg paint.  If you're anything like me, the first thing to pop into your head maybe something along the lines of "won't that stink"?  While some people have reported a smell, most people who use egg paints will tell you that so long as the eggs are fresh and the paint is thin and is used quickly, there shouldn't be much more than a slight scent that disappears within a few days.  It is recommended that egg paints be used either on small projects or in small sections for a larger project.  And be patient with it, using several thinner layers, rather than trying to get the job done in fewer, heavier coats.  This should minimize any smell that may happen.  This isn't really anything new, either.  In fact, it was commonly used in renaissance painting until oil paints made their appearance on the scene in the latter renaissance.  To make egg paint, again is very simple.  What type of egg you use isn't really that important.  Take the egg and separate the white from the yolk.  Once the white has been removed, hold the egg over a cup or bowl and puncture the sac around the yolk.  The yolk will pour out.  To the yolk, add water to make a consistency of a thin cream.  Add your pigment, and whola!  You can store it in an airtight container in the refrigerator for no more than a day or two.  This paint tends to have a slightly more glossy appearance when it's dry.


There are also recipes for the vegan, or anyone who doesn't like the idea of using an animal-based product.  And these are just as simple.  Flour paint.  Flour, water, pigment.  That's it.  This one can even be used out doors with great results, depending on climate.  Chalk paint.  Whereas the term "chalk paint" generally refers to a specific brand of store-bought paint, a similar paint can be made by adding pigment and water to sodium bicarbonate (baking soda), plaster of paris(may not be ideal for natural walls that need to breathe), borax, or calcium carbonate (think of those powdery tablets that treat gas and heartburn).  Each of these creates a slightly different effect, so play around and experiment before going all in on your walls.


Finally, we come to tadelakt.  This one is slightly more complex, but definitely has a place and a purpose.  In simplest terms, tadelakt is a lime plaster (with or without pigment) that is sealed with a black olive oil soap.  The olive oil soap is crucial in that it makes the plaster virtually waterproof, while still allowing walls to breathe.  Tadelakt has a history that traces back hundreds of years in Morocco.  Accordingly, true tadelakt can only be made with lime from that region.  The effect, however can still be accomplished with any good lime plaster.  It is time consuming.  Two to three layers (minimum) of plaster should be applied, allowing ample drying time between, until you get to the last layer.  While the last layer is still partially wet, you start applying the oil.  Applied in small areas at a time, apply the oil/soap and buff with a stone made specifically for that purpose.  This pushes the oil into the plaster and tightens it's "pores".  The finished product is a beautiful, deep color with a shine.  With minimal upkeep, this finish is ideal for bathrooms, kitchens, or any area that sees a lot of moisture.


As for pigments, well, you have a few options here, as well.  You can easily purchase natural powdered pigments online (and occasionally in stores).  As always, do some research on any company you are thinking of buying from.  Make sure they are really using natural materials.  Or.... you can make your own pigments.  Traditionally, pigments can be made of ground up stones, minerals or plants.  You can use the same materials to make your own.  Some minerals may need a bit more work to get them into powdered form, depending on their hardness.  But it can be done.  Think of ancient Egypt.  They would grind up malachite for green, lapis lazuli for blue, charcoal for black.  If you can powder it, you can use it.  Well, for the most part.  Again, research.  You don't want to go grinding up lead or some other toxic mineral.  Even malachite is potentially toxic, and it is not recommended to breathe in the dust.  So please be careful if you choose to do this.  Plants, however can be used just as easily.  This can be done in two ways.  You can dry the plant in order to make a powder pigment.  Or, you can use the juice from the plant itself, if possible.  If there is no juice, like in onion skins, boil the plant/skins in water to release the pigment, and then use that water.  Simple and inexpensive or even free if you take a nature walk or pull from your own garden.


Painting can be a fun and enjoyable experience that doesn't have to drive you crazy with smells and chemicals.  This is a time to let out your inner child.  Have some fun and experiment.  You never know what you might come up with.

http://translate.google.com/translate?sl=auto&tl=en&js=n&prev=_t&hl=en&ie=UTF-8&u=http%3A%2F%2Fengelleben.free.fr%2Findex.php%2Frecette-de-la-peinture-a-la-farine-protection-des-bois-exterieurs

http://www.earthpigments.com/

http://www.artesano-home.com/tadelakt.html

http://www.tierrafino.com/lime_plasters

http://www.unearthedpaints.com/pages/what-are-natural-paints

http://www.motherearthnews.com/diy/natural-paint-zmaz06onzraw

https://www.theguardian.com/lifeandstyle/2009/feb/09/eco-natural-paints-guide-best

http://www.naturalpaint.com.au/

http://www.naturalearthpaint.com/pages/resources-natural-paint-recipes

http://www.instructables.com/id/Paint-Made-from-Berries-Nature/

http://recyclenation.com/2015/04/how-to-make-dyes-paints-from-plants

http://www.thehippyhomemaker.com/diy-natural-herbal-earth-paints/

http://www.offthegridnews.com/how-to-2/the-secrets-of-homemade-paint/

http://www.instructables.com/id/Chocolate-Milk-Paint/?ALLSTEPS

http://www.danielsmith.com/content--id-105

http://www.puretadelakt.com/

http://tadelakt.it/

http://ecobrooklyn.com/tadelakt-moroccan-plaster-technique/

Sunday, January 8, 2017

Homestead Green Building: Interior Floors

This week starts a bit more of the fun and flexible side of building your own homestead.  Well, in all honesty, this whole process is fun, in my opinion.  We are now entering the final few weeks of this series.  We've looked at temporary housing, alternative energy, and green building styles.  Those are the basics, the building blocks upon which everything else is based.  They are the foundation necessities that come inherently with building a homestead.  Now we get into the more ornamental aspects.  Necessity becomes a relative term.  So let's get going with a look at types of flooring.


A normal floor in a traditional home would generally include a concrete slab, a plywood substrate, and then either carpet, tile, linoleum, wood, or some mix of the above.  Well, green alternatives aren't that much different.  Now, if you are going so far as to build in a green manner, utilize alternative energy, and for all intents and purposes are building a homestead with a desire to be simple, healthy, and green, it only makes sense that you would want the interior of your home to also be created with those same intentions.  After all, why build a healthy green home only to fill it with materials containing synthetics, chemicals, petroleum, or who knows what else?  So what are your options for remaining simple and green?


By far, the simplest, and least costly option would be adobe floors.  If you can build a cob home, you can lay an adobe floor.  The ingredients are the same: sand, clay, water, and straw.  The amounts of each will change as you put down layers.  It will have to be done in sections, and then in layers (generally 2 - 3).  A good substrate is important.  While you will need some sort of moisture barrier and insulation, you won't have to have concrete or even plywood laying beneath your floors.  I will include links at the bottom of this post with detailed instructions of how to go about laying an adobe floor.  This is definitely a great option, especially if you are on a tight budget.  And please, don't for one second think that you are going to be living with dingy, dirty floors.  Adobe floors can be quite beautiful, and they are very strong and durable.


Your next option is, believe it or not, carpet.  Yes, you can have comfy, soft, warm carpet in a green home.  And you can have it without chemicals and synthetic dyes.  And, yes, you can have wall to wall carpeting, or throw rugs.  The most common forms of natural carpeting are wool and hemp.  Both are extremely durable and readily available.  You can also find natural carpets and rugs made from sea grass, jute or coir (coconut hull).  The trick here is to do your research.  Just because the carpet is made from a natural material, that doesn't automatically mean that it's green.  Double check with your supplier to ensure that there have been no chemicals added, whether it be dyes, stain retardants, fire retardants, or whatever else.  And don't forget the backing.  A really good supplier will also offer a natural, non-toxic backing/padding for your carpet.


Next up is wood.  I'm not talking about your typical hardwood floors, although those are beautiful, and if made from sustainable timber, are an option.  No, what I'm referring to here is cork, bamboo, cordwood, pallet wood, and so on.  Pallets are a great way to create your own hardwood floors from wood that might otherwise be scrapped.  So long as it contains no chemicals in it, you are good to go with your green flooring.  Cordwood floors generally are the random butt ends of logs.  They can be varying sizes, varying types of wood.  It makes for an interesting and lovely alternative.  Cork is the bark of a tree known as the cork oak.  The wonderful thing about cork is that while it is wood,  it is soft and gives slightly underfoot, making an excellent option for anyone who might want or need a little extra padding or give as they stand.  The downside is that it can be on the expensive side.  Finally, I'm including bamboo here, because although it is a grass, it is as hard as wood.  It's attractive and durable.  You can even grow your own, just as you could if building a bamboo home, so long as you take the same time, care, and precautions for it that you would for the walls of your home.  Maintenance on any of these will likely be similar, depending on how you choose to seal it.


Now if you like the look and ease of linoleum, you can even get that in the form of "marmoleum".  According to this site, marmoleum is "a compound of linseed oil, rosins, cork flour, limestone, and wood flour that's adhered to a nontoxic jute backing".  Quite frankly, I've read from several sources that "real" linoleum is actually that exact same recipe.  Sadly, most linoleum on the market is synthetic or vinyl.  So, if you can find real linoleum, you are getting the benefits of linoleum and still being green.  Who knew?


Finally, there are resin floors.  Yes, I know: resin?  Believe it or not, yes.  While most resins are petroleum based products, there are natural resins available that are just as good and durable.  They are generally mixed and poured the same way as petroleum based resins, but are, obviously, much better for the environment.  If you choose resin, it can be poured over wood, stone, gravel, glass, tile, or whatever else your creative mind may desire to use.  If it's a breathable resin, it can even be poured over adobe.  If you are feeling really creative, you can even do an adobe floor, use a natural paint (which I'll cover next week), and then seal it with a natural resin.


So there you have some amazing green flooring ideas.  You can easily keep your home green and healthy while also having gorgeous floors at a minimal price.  And bonus, you can get marvelously creative in the process.  Above all, have fun and enjoy the process.

Adobe Floors

http://buildnaturally.blogspot.com/2014/01/adobe-floor-basics-how-to-build-dirt.html

http://greenbuildingelements.com/2008/11/06/natural-building-101-how-to-make-an-earthen-or-adobe-floor/

http://greenbuildingelements.com/2008/11/06/natural-building-101-how-to-make-an-earthen-or-adobe-floor/

http://www.greenhomebuilding.com/QandA/adobe/floors.htm

http://www.dancingrabbit.org/about-dancing-rabbit-ecovillage/eco-living/building/natural-building/earthen-floor/

Natural Carpet

https://www.organicandhealthy.com/naturescarpet.html

http://www.greenbuildingsupply.com/All-Products/Flooring-Wool-Carpet

http://www.earthweave.com/

http://www.treehugger.com/green-architecture/earth-weave-craft-carpets-of-wool-and-hemp.html

Wood

http://abuildingweshallgo.blogspot.com/2013/05/the-art-of-pallet-wood-flooring.html

http://awesomejelly.com/a-diy-step-by-step-process-to-making-your-own-gorgeous-natural-cordwood-floor/

http://www.handimania.com/diy/natural-cordwood-floor.html

https://www.profloortips.com/hardwood/pallet-wood-flooring-guide/

http://www.1001pallets.com/pallet-building/pallet-flooring/

https://www.thisoldhouse.com/ideas/all-about-bamboo-flooring

http://www.diynetwork.com/how-to/rooms-and-spaces/floors/how-to-install-bamboo-plank-flooring

http://www.houzz.com/ideabooks/1293102/list/cork-flooring-101-warm-up-to-a-natural-wonder

Marmoleum

https://dengarden.com/home-improvement/Pros-and-Cons-of-Marmoleum-Flooring

http://ths.gardenweb.com/discussions/2694880/marmoleum-who-has-it-who-loves-it-and-would-you-do-it-again

http://ask.metafilter.com/131023/Should-I-get-a-Marmoleum-kitchen-floor

Natural Resin

https://www.quora.com/What-is-an-ecological-alternative-to-epoxy-resin

http://www.ecopoxy.com/

https://www.glen-l.com/phpBB2/viewtopic.php?t=13149

https://entropyresins.com/question/natural-fiber-epoxy-vs-carbon-fiber-vs-plastic-3/

http://craftingagreenworld.com/2010/09/10/finally-an-eco-friendly-epoxyresin/

https://answers.yahoo.com/question/index?qid=20090908212123AAngsWE

http://www.thomasnet.com/articles/plastics-rubber/bioresin-plastics

Sunday, January 1, 2017

Homestead Green Building: Insulation

I hope that everyone had a safe and wonderful Christmas and new year celebration.  It was a nice, quiet time around here.

Before I get into this week's post, I would like to take just a quick look back.  For those who may not have been following along, several months ago, I decided to start a series on how to go off grid and build a homestead geared specifically for anyone who might not know the first thing about how to go about it.  I figured this would be a good series to do for the simple reason that I, myself, knew very little about homesteading before doing some in depth research.  So far, I've covered temporary housing, alternative/renewable energy sources, and green building styles that pretty much anyone can do.  In line with the green building styles, I've also covered foundations and roofs.  That catches us up to this week.  So, let's talk insulation.


Now, depending on the building style you choose to go with, and where you are building, your insulating needs are going to differ.  Most of the building styles we've looked at over the past few weeks, will not necessarily require any additional insulation beyond what is put into the wall itself as you are building.  You can always double a wall to add an insulating layer if you are choosing to go with a building style that focuses more on thermal mass than insulating properties.  But that's not an absolute must, as we have seen.  But you will need to have some sort of insulation, at the very least, in your foundation and roof.  Seems pretty obvious, right?  So, what are your options here?  It is something that may seem like an easy choice, but there are a lot of things to consider.  And it is important to have as much information and planning already in mind before you ever start building anything.  You don't want to get half way through your build only to find you've completely forgotten about something so important as insulation.


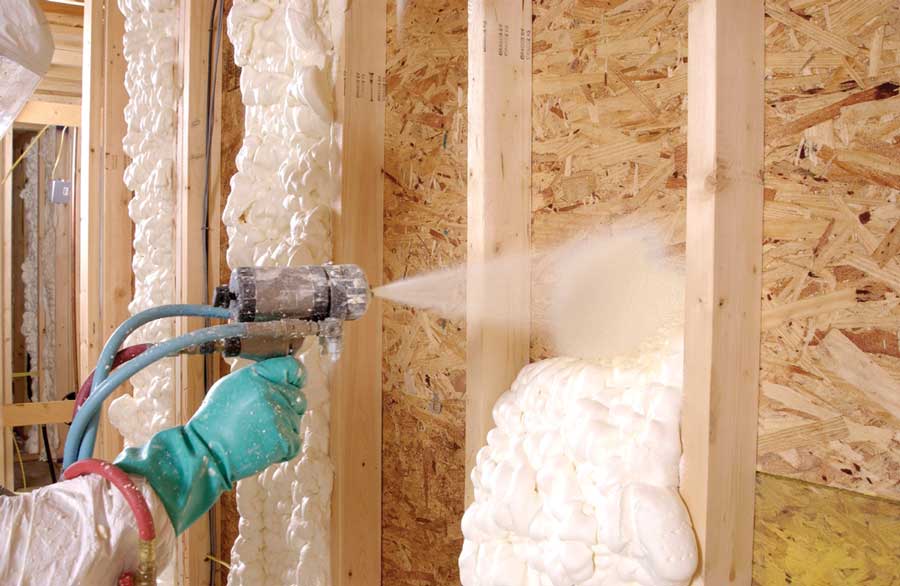
The most common types of insulation used today in traditional building is either fiberglass or polyurethane.  While it is very common, and on the less expensive side (particularly fiberglass), it is not exactly a healthy choice.  Neither of these options are sustainable or eco-friendly.  Fiberglass can irritate your skin and lungs.  Polyurethane is an oil based product.  Both are loaded with chemicals.  And there is a lot of debate out there as to whether there is off-gassing  once it has been put into place.  What is not in debate, however, is the vast number of people who have severe reactions to these products: from skin irritations, to asthma and other breathing issues.  Not exactly a glowing welcome for anyone who wants to go green.  But the good news is that there are options to those.


I'm sure you've probably already heard of using recycled denim as an insulation.  Well, truth be told, there are differing opinions as to how green that really is.  Supporters will say that it is great because it is not only recycling something that would otherwise go into a dump, and it is made of cotton, which is a very good insulator.  Opponents say that while it is recycling a good insulator, the cotton itself, if not organic, will still be loaded with chemicals that were sprayed onto the plant before it was ever even harvested.  And if you purchase denim that has already been prepared for a second life as insulation, it has more than likely also been treated with fire retardants, mold resistance, and who knows what else.  In the resource list at the end of this post, you will find links to both sides of that story.


But there is more than just denim on the market.  In my post on cordwood as a building style, we saw that one method of building is to include an insulating layer of sawdust or similar material.  And in my post on foundations, we saw a builder who utilized red lava rock.  There are many many more.  There are a lot of people out there looking for and testing green options for housing insulation.  Most of these are focused around some sort of plant fiber.  Hemp and kenaf are the two most common at the moment.  Plant fibers have a natural insulating quality to them.  It's just the nature of plants.  Not all plants will work, but many woody varieties will, to one extent or another.  The center of the plant is generally separated out and broken down into individual fibers, and then bound together to form sheets, spray, or a loose insulation.  If you choose to use one of these plant based insulators, keep in mind that while the main ingredient may be green, it may be mixed with not-so-green binders, retardants, etc.  So please do your research.


Cellulose is another alternative that you will likely hear a lot about.  It is, at it's most basic form, recycled paper, transformed into one form or another.  It can be a great insulator, but again, it is one with a lot of debate surrounding it.  Being that it is paper, should you ever have a water leak, you might be in for a nasty surprise.  There is also the concern of what type of paper has been used to create the cellulose.  Most modern papers made today utilize some form of chemical treatment.  That can be the case no matter if it's plain white paper, or a printed newspaper.  Again, do your research, especially if you are sensitive.


Wool, soybeans, and even aerogel are proposed alternatives for a greener insulation.  Ok, so aerogel isn't really "green", so to speak.  But I came across it as an alternative, so I decided to go ahead and throw it in there.  It does have some qualities I like in so much as being able to insulate windows without losing light.  But in all honesty, it's not all that green, and if not sealed up properly, can have just as many irritating effects as fiberglass.  So the pros on that one, for me at least, are definitely outweighed by the cons.


So there you have it.  There are some really good green alternatives to traditional insulation for your homestead.  What you use will be as personal a choice as any other aspect of your home.  Look around, do some research, weigh the pros and cons, and find what truly works the best for you.  Good luck, and happy researching!

https://www.nsf.gov/discoveries/disc_summ.jsp?cntn_id=132778

https://www.fpl.fs.fed.us/documnts/fplgtr/fplgtr80.pdf

https://www.scribd.com/document/268336631/Natural-Fiber-Reinforced-Building-Materials

http://www.kew.org/science-conservation/plants-fungi/building-materials?sort_by=field_latin_name_value

http://www.energiaus.com/news/2015/2/12/denim-insulation-an-alternative-option

http://www.ecobuildingpulse.com/products/four-green-alternatives-to-spray-foam-insulation_t

http://www.treehugger.com/green-architecture/greener-alternatives-spray-foam-insulation.html

http://www.qualifiedremodeler.com/pros-and-cons-of-installing-alternative-insulation/

http://inhabitat.com/lets-talk-about-insulation-baby/

http://www.finehomebuilding.com/2009/06/29/why-i-dont-use-cellulose-or-blue-jean-insulation

http://home.howstuffworks.com/home-improvement/construction/green/5-green-insulation-options.htm

http://activerain.com/blogsview/4236757/soy-beans--shredded-denim--and-wool-will-keep-you-warm-this-winter-

http://www.naturalbuildingblog.com/affordable-lava-rock-insulation-for-the-far-north/

Sunday, December 18, 2016

Homestead Green Building: Roofs


Roofs are probably one of the last things you think about when you start planning your homestead, right?  You may think standard style roofing trusses or whatnot.  Maybe you just think in terms of what you're going to need in order to place solar panels on top.  There is, however, a lot to consider, and it needs to be done while, or maybe even before, you decide what the general building style and materials of your home is going to be.  You must consider how large of a space you are covering, if it's going to work like a standard roof, if you want something simple where it's bare minimum with beams showing on the interior, if you want an attic large enough to maybe eventually turn it into an extra room, etc.  The good news is that there are options for a green roof that are not only beautiful, but also relatively simple to build.  Well, simple so long as a few - rather important - considerations are taken into account.  So let's take a look at some options - and a lot of pictures.


The simplest design would be a dome roof.  Dome? Simple?  Actually, yes!  Very much so! Most of the building styles we've looked at can easily be adapted to include a dome roof.  The walls simply continue up, gradually working there way into a smaller and smaller area.  Ideally this is done when the house design, itself, is a round house.  It can be done with other shaped footprints.  It just flows better (personal opinion) with a round home.  Of course, it will take extra considerations in so much as any weatherproofing that should be done to protect a natural material, such as cob or adobe.  The benefits of a dome go beyond just the idea of extending the walls up.  For smaller domes, often times there is no need for extra support.  Larger domes may need rebar or some other form of extra support.  The design of a dome lends itself very nicely to building in areas that may be subject to earthquakes, and even hurricanes.  This design has been used for centuries, showing that it can stand the test of time.


The next roofing idea is a reciprocal roof.  If you are unfamiliar with these beauties, I highly suggest you get familiar.  They are beautiful.  In fact, they can be absolutely stunning!  The idea, again building on a round house, is that timbers are stretched from the exterior walls to the middle of the space where they interlock with each other.  It can consist of as little as three timbers, to pretty much as many as you want to have.  It is self supporting, and surprisingly strong.  A center support is not needed, although there are some who would encourage it for a larger space.  A reciprocal roof can span as small or as large of an area as you need, assuming you can find timbers the length you need.  You can even build a double reciprocal design.  When done right, any weight on top of the roof pushes down, causing the timbers to press into each other as opposed to pushing out towards the walls.  These timbers are left visible on the interior, creating a simple, rustic, and amazing design.  What goes on top of this frame is up to you.  While you could cover it with standard tiles or shingles, it can also bear the weight of a green, or living roof.


A living roof is pretty much exactly what it sounds like: it's a roof made of grass or some other living plants.  A simple design: waterproofing, drainage, soil and plants.  This option is almost a guarantee when choosing an underground or even an earth bermed home.  Now, there are some very serious considerations with this one.  The soil and whatever you choose to use in your living roof is going to vary depending on where you are.  Because of that, there is no standard in determining weight load. This is vital to the overall structure of your home.  Too much weight sitting on top of a wall that isn't properly supported will lead to disaster.  With properly built walls, the next thing to consider is what is going beneath the soil and plants in terms of support across the expanse of the roof.  This is where a reciprocal roof becomes a great idea.  Since they can support heavy loads, they are ideal for heavier mediums used in green roofs.  Another thing to consider with a green roof are dead loads and live loads.  Dead loads would include the medium, plants, and snow loads (where applicable).  Live loads would include people and/or animals that may walk across the roof.  All of these things must be taken into consideration when figuring overall weight load.  You also have to consider, and properly plan for adequate drainage.  While the soil or other medium will absorb a certain amount, it's crucial to completely seal up the roof so that no excess water finds it's way into your home. For waterproofing, the most commonly suggested material will be the same waterproofing material that would be used with a standard roof, along with an extra layer of poly laid on top.  Here, however, is a design that uses birch bark for waterproofing in a church built more than 130 years ago.


So there are three green options for your homestead roof.  Of course, there are a number of other roofing options out there, including traditional standard roofing.  These, however, are what I would consider the best green options.  As with anything else, do some research and find what works best for you and your homestead.  Please remember that I am in no way an expert or professional.  I am merely here to provide a starting line for you to leap off of for ideas.  I will be taking next week off for Christmas, but I will return after New Year.  Here are a few places to do a little more reading on the roofs I've covered here.

Dome Roofs

http://ilovecob.com/archive/the-dome

https://www.intelligentliving.co/building-earthen-dome-homes-6-weeks-diy/

http://www.earthbagbuilding.com/faqs/domes.htm

http://www.earthbagbuilding.com/plans/envirodome.htm

Reciprocal Roofs

http://greenbuildingelements.com/2008/10/01/the-reciprocal-roof-beauty-strength-and-simplicity-in-a-roof-frame/

http://www.thatroundhouse.info/reciframes.htm

http://www.theyearofmud.com/2008/11/26/how-to-build-a-reciprocal-roof-frame/

http://www.naturalbuildingblog.com/reciprocal-roofs/

Living Roofs

https://www.gsa.gov/portal/mediaId/167831/fileName/Challenges_to_Green_Roof_Construction.action

http://straw-bale.blogspot.com/

http://www.livingroofsinc.com/


Sunday, December 11, 2016

Homestead Green Building: Foundations

A house is only as good as it's foundation.  You've heard that before, right?  Well, it's true.  When it comes to green building, there's really not a whole of information out there (at least not that I've found) on building a green foundation.  Even within a vast majority of green building resources, a concrete foundation seems to be quite common, and even highly suggested.  It's by no means the only route to go, though.


As we've seen in looking at some of the different building styles, there is something at the base that is called a rubble trench.  This allows you to build with a natural material, and yet keep it off the ground so as to help it last longer - much much longer.  A rubble trench is considered a foundation.  It is a foundation upon which you will build your walls.  The technique has been around for a very long time, but it wasn't until architect Frank Lloyd Wright began using it that it started to regain popularity.  Even today, a lot of code enforcement doesn't include rubble trenches.  So you may have to do a little research, and maybe a lot of educating, in order to get your rubble trench approved.  I haven't gotten into it too much before, so here's the basics of a rubble trench foundation.  This will be the overall outline of your home; where the walls will sit.  You can do it by hand, but a small backhoe is not a bad idea.  Dig a trench where you want the exterior walls to be.  This trench should be a minimum of 16 - 24 inches wide, and go down to a few inches beneath the frost line.  Dig the trench so that there is a slight slope going downhill and away from the house.  This will help with drainage, keeping moisture away from your home.  Once the trench has been dug, now you need to fill it.  Tamp it down.  A good hand tamper will work nicely.  Start with a breathable layer of wicking material.  This will aid in the drainage, and also keep the rest of your foundation walls from settling too much.  Now starts the "rubble".  Use rocks, stones, recycled concrete, or something similar.  Each piece should be 1 1/2 to 3 inches big.  Fill the trench up about 4 inches.  This should be at or slightly below the frost line.  Now lay a pipe.  This pipe should be roughly 4 inches diameter with holes drilled all around at regular intervals.  Yes, this is another step to help with drainage.  Once the pipe has been laid, fill the trench the rest of the way up to grade level.  Don't forgt to tamp every vertical foot or so.  This is where you'll begin your stem wall and then whatever building material you choose on top of that.  It's simple, it's effective, and it's natural.  It is a lot of work, but it's worth it.


So that's a good foundation for the walls.  Now what about the rest of the house.  What do you do beneath the floors?  That's where it can get as simple or as complex as you want.  If you really want to go rustic, you can simply have dirt floors.  Or, you can always go the route of building your home on stilts.  That's an entirely different set of circumstances that I'm not going to get into here.  For a home that sits on the ground, assuming you don't want a dirt floor, there are some things that hold true no matter how you proceed next.  No matter what else you decide to do, you must have a moisture barrier, as well as a radon barrier.  Radon is a gas that is naturally released from the ground, and it is toxic.  Personally, I would think it's a horrible mistake to not put in a radon barrier.  Yes, this and the moisture barrier will most likely be a form of plastic.  I regret to inform you that it is currently the best thing out there to provide an adequate barrier.  I will update this post if I find a natural alternative.  Now, when it comes to barriers, make sure to know the difference between a moisture barrier and a vapor barrier.  They are not the same thing.  Utilized improperly, and you may inadvertently trap moisture where you don't want it.  Consult a professional for any questions you may have.  Beyond those two things, insulation is the next consideration.  This is not a requirement everywhere.  But again. I think it's something that should not be skipped.  There are natural insulation alternatives.  Here are a few options.  While primarily used in walls and ceilings, it can also be adapted to floors.  It all depends on what you're planning to use as your actual flooring material.  Personally, I think my favorite flooring idea comes from here.  A layer of volcanic rock is used for the insulation.  The author here goes through all the steps of making his floor, even including tubing for a radiant heat system.  And then lastly, is his earthen floor.  I'll get into earthen floors (and a lot more) in a later post.  But this is a good system.  Now he states that there is not a lot of R value in his floor, but it's ok for him because of the nature of the building he's constructing.  More could definitely be added for a home floor.


So there you have it.  It's pretty basic.  Always remember that there may be certain code requirements for residential buildings.  Please check and make sure that you are well informed.  It always helps the process go smoother if you are aware of information that code enforcement may not be.  You may need to - politely - educate them.  When in doubt, always consult a professional.  Here are some links with further information on foundations.


http://thehtrc.com/2010/building-green-homes-footings-foundations

http://www.homeadvisor.com/article.show.Going-Green-Foundations-Retaining-Walls-and-Waterproofing.16451.html

http://www.ecobuildingpulse.com/news/part-6-foundation_o

http://www.diynetwork.com/how-to/maintenance-and-repair/sustainability/the-basics-of-eco-house-construction

https://greenbuildingsolutions.org/green-building-materials/foundations/

https://www.buildinggreen.com/blog/choosing-foundation-materials-subconscious-decision

http://www.buildnaturally.com/EDucate/Articles/RubbleTrench.htm

Sunday, December 4, 2016

Break Week

I am taking a break this week in order to focus my attention on helping my son study for semester final exams.  I thank you for your patience and understanding.  I will be back next week with information on green foundations.  Have a good week everyone!